4 Manual Payment
4.1 Overview
Manual checks and prepayments check to employees and supplier basis if the payment is released immediately.
4.2 Pay an Invoice manually
-
Choose the following path:
Payments ► Entry ► Payments
Page 8 of 8
End user Manual for Account Payable
The following window will open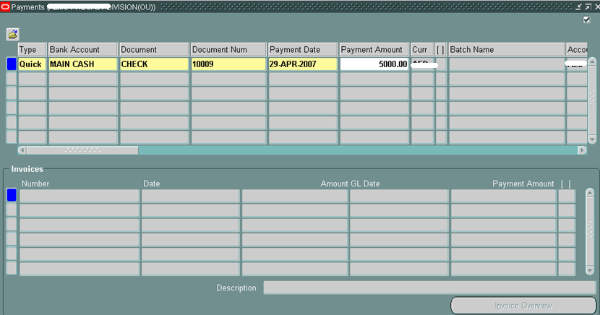
-
Fill in the following field
Name of the filed
Content
Comments
Type
Choose Manual
Bank Account
Select the Bank Account
Document Name
Select the Document Name
AP will allow you to select only Computer Generated orCombined Payment Documents associated with the selected Bank Account
Document Number
Click on OK
AP will reserve the document Name at this point
Payment Date
Enter the payment date or type [Tab] to accept the default date of today
Payment Amount
You can either enter the amount or leave it empty so that AP will calculate it with the invoices you will choose in the next step
Supplier Name or Supplier Number
Enter the Supplier name
Supplier site
Enter the Supplier site or press Tab to accept default data
-
Click on Enter / Adjust Invoice to choose the invoice to pay
The following window will open
Page 3 of 3
End user Manual for Account Payable
-
Select the invoices you want to pay (Payables will only allow to select invoices which have a Check payment type associated with them, and which have the same currency as the payment document)
-
Save your work, and return to the Payments window. Payables automatically enter the payment amount.
1.1 Printing a Payment
-
Click on the action, the following window will open
2 Batch Payment
2.1Batch Payment Process
This payment format contains one credit line and multiple credit lines.
This format requires one debit line for every credit line.
Payment batches are used to generate checks for batch of invoices from many vendors. There is a series of steps to follow to print checks with a Payment Batch. Most steps are initiated from the Payment Batch Actions window. The steps are:
Initiate Payment Batch
Select Invoices/Verify Payment Register
Modify Payments
Format Payments
Print Checks
Confirm Payment Batch
2.2 Initiating Payment Batches
-
Choose the following path
Payments ► Entry ► Payment Batches,
The following window will open
2. Fill in the following field
Name of the field
Content
Batch Name
Enter the Payment Batch Name. This name will appear on your reports and will help you locate the batch online.
Ex: User Initial / Date – year
Payment Method
Verify the Payment Date.
Pay group
Optionally select Pay Group. AP will select invoices with this Pay Group.
Bank account
Optionally change the Bank Account.
Payment Document
Select the Payment Document.
Pay through Date
Verify the Pay Through Date. AP will select invoices with a discount or due date on or before this date.
Payment Limit
Optionally review or adjust the payment limits.
2.3 Selecting invoice / Verify Payment Register is correct
- Click on Actions Button.
- Select Invoices & Build Payment & Print Preliminary Register.
- Click on the button OK:
Payables will initiate three concurrent processes, Auto Select, Build Payments and Preliminary Payment Register.
Page 4 of 4
End user Manual for Account Payable
The Preliminary Payment Register is printed when the invoices are selected and the payments are built. It should be used to review the payments Payableswill create when you format payments for the invoices in a Payment Batch.
You should review the Preliminary Payment Register to see which invoices and vendors will be paid, the discounts taken, and the total amount paid to each vendor.
Payables group the invoices by vendor site and print the total for each payment for a site.
Payables prints asterisks and a non-payment reason for the invoicesselected for payment in the payment batch, but that do not meet payment requirements.
Payables does not create payments for a vendor site's invoices if the total of the selected invoice(s) exceeds the maximum payment amount or is less than the minimum payment amount that you specified for the payment batch, or the total payment amount for a vendor site is less than or equals zero.
- Check the Preliminary Payment Register to ensure that all the invoices needing payment are included on the register. You should also check to ensure that no payments will be generated for invoices that should not be paid.
- After the concurrent request are finished you need to requery the Payment Batch form, when the Status field changes to Built and the Payments button becomes active you may proceed to the next step.
- To requery the form you may use one of the following methods:
Select Tools, Refresh Status.
Click on the button ‘Refresh’ (available on the latest Oracle versions).
1.1 Modify Payment
Then after reviewing the Preliminary Register you can modify the Payment Batch by:
Changing the payment amount of an invoice
Preventing payment to a supplier
Preventing payment of a particular invoice
Adding an invoice that Payables did not select.
In order to modify a Payment Batch the status must be built. (i.e. The Payment Batch must be initiated but cannot have formatted payments)
- Choose the following path:
Payments ► Entry ► Payment Batches
- Choose View, Find (or F11)
- Select the appropriate Payment Batch.
- Click on Payments Button.
You can navigate between the various suppliers selected to be paid, by clicking the PgUp/Pg Dn keys while the cursor is in the Supplier field.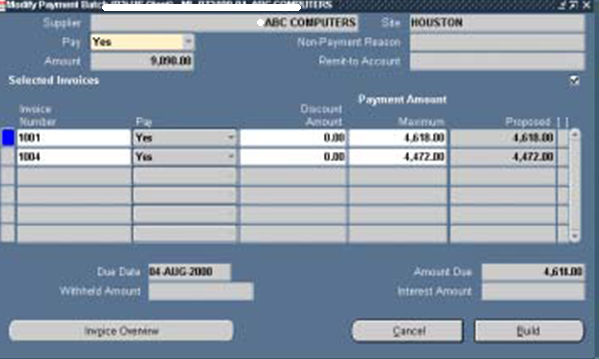 1.1.1 Adding an invoice to a payment batch
Clear the form and then enter the Supplier name and Site.
Select Yes for Pay supplier.
AP displays the approved invoices for the supplier site.
Select Yes for Pay invoice for each invoice you want to add to the payment batch.
1.1.2 Removing an Invoice from Payment Batch
Query the Supplier name and Site.
AP displays the invoices for the supplier site which were selected for thepayment batch.
Select No for Pay invoice to remove it from the Payment Batch.
1.1.3 Removing all Invoices for a Particular supplier site from a payment batch
Query the Supplier name and Site.
Select a Non-Payment Reason for your records (Optional).
Select No for Pay supplier.
1.1.4 Changing payment or discount amounts for a selected invoice
Query the Supplier name and Site.
AP displays the invoice(s) for the supplier site, which were selected for the batch.
Alter the payment or discount amounts for the invoice.
1.1.1 Adding an invoice to a payment batch
Clear the form and then enter the Supplier name and Site.
Select Yes for Pay supplier.
AP displays the approved invoices for the supplier site.
Select Yes for Pay invoice for each invoice you want to add to the payment batch.
1.1.2 Removing an Invoice from Payment Batch
Query the Supplier name and Site.
AP displays the invoices for the supplier site which were selected for thepayment batch.
Select No for Pay invoice to remove it from the Payment Batch.
1.1.3 Removing all Invoices for a Particular supplier site from a payment batch
Query the Supplier name and Site.
Select a Non-Payment Reason for your records (Optional).
Select No for Pay supplier.
1.1.4 Changing payment or discount amounts for a selected invoice
Query the Supplier name and Site.
AP displays the invoice(s) for the supplier site, which were selected for the batch.
Alter the payment or discount amounts for the invoice.
Choose the following path:
Fill in the following field
Name of the filed
|
Content
|
Comments
|
Type
|
Choose Manual
| |
Bank Account
|
Select the Bank Account
| |
Document Name
|
Select the Document Name
|
AP will allow you to select only Computer Generated orCombined Payment Documents associated with the selected Bank Account
|
Document Number
|
Click on OK
|
AP will reserve the document Name at this point
|
Payment Date
|
Enter the payment date or type [Tab] to accept the default date of today
| |
Payment Amount
|
You can either enter the amount or leave it empty so that AP will calculate it with the invoices you will choose in the next step
| |
Supplier Name or Supplier Number
|
Enter the Supplier name
| |
Supplier site
|
Enter the Supplier site or press Tab to accept default data
|
- Click on Enter / Adjust Invoice to choose the invoice to pay
The following window will open
Page 3 of 3
End user Manual for Account Payable
- Select the invoices you want to pay (Payables will only allow to select invoices which have a Check payment type associated with them, and which have the same currency as the payment document)
- Save your work, and return to the Payments window. Payables automatically enter the payment amount.
1.1 Printing a Payment
- Click on the action, the following window will open
2 Batch Payment
2.1Batch Payment Process
This payment format contains one credit line and multiple credit lines.
This format requires one debit line for every credit line.
Payment batches are used to generate checks for batch of invoices from many vendors. There is a series of steps to follow to print checks with a Payment Batch. Most steps are initiated from the Payment Batch Actions window. The steps are:
Initiate Payment Batch
Select Invoices/Verify Payment Register
Modify Payments
Format Payments
Print Checks
Confirm Payment Batch
2.2 Initiating Payment Batches
- Choose the following path
Payments ► Entry ► Payment Batches,
The following window will open
2. Fill in the following field
Name of the field
|
Content
|
Batch Name
|
Enter the Payment Batch Name. This name will appear on your reports and will help you locate the batch online.
Ex: User Initial / Date – year
|
Payment Method
|
Verify the Payment Date.
|
Pay group
|
Optionally select Pay Group. AP will select invoices with this Pay Group.
|
Bank account
|
Optionally change the Bank Account.
|
Payment Document
|
Select the Payment Document.
|
Pay through Date
|
Verify the Pay Through Date. AP will select invoices with a discount or due date on or before this date.
|
Payment Limit
|
Optionally review or adjust the payment limits.
|
2.3 Selecting invoice / Verify Payment Register is correct
- Click on Actions Button.
- Select Invoices & Build Payment & Print Preliminary Register.
- Click on the button OK:
Payables will initiate three concurrent processes, Auto Select, Build Payments and Preliminary Payment Register.
Page 4 of 4
End user Manual for Account Payable
The Preliminary Payment Register is printed when the invoices are selected and the payments are built. It should be used to review the payments Payableswill create when you format payments for the invoices in a Payment Batch.
You should review the Preliminary Payment Register to see which invoices and vendors will be paid, the discounts taken, and the total amount paid to each vendor.
Payables group the invoices by vendor site and print the total for each payment for a site.
Payables prints asterisks and a non-payment reason for the invoicesselected for payment in the payment batch, but that do not meet payment requirements.
Payables does not create payments for a vendor site's invoices if the total of the selected invoice(s) exceeds the maximum payment amount or is less than the minimum payment amount that you specified for the payment batch, or the total payment amount for a vendor site is less than or equals zero.
- Check the Preliminary Payment Register to ensure that all the invoices needing payment are included on the register. You should also check to ensure that no payments will be generated for invoices that should not be paid.
- After the concurrent request are finished you need to requery the Payment Batch form, when the Status field changes to Built and the Payments button becomes active you may proceed to the next step.
- To requery the form you may use one of the following methods:
Select Tools, Refresh Status.
Click on the button ‘Refresh’ (available on the latest Oracle versions).
1.1 Modify Payment
Then after reviewing the Preliminary Register you can modify the Payment Batch by:
Changing the payment amount of an invoice
Preventing payment to a supplier
Preventing payment of a particular invoice
Adding an invoice that Payables did not select.
In order to modify a Payment Batch the status must be built. (i.e. The Payment Batch must be initiated but cannot have formatted payments)
- Choose the following path:
Payments ► Entry ► Payment Batches
- Choose View, Find (or F11)
- Select the appropriate Payment Batch.
- Click on Payments Button.
You can navigate between the various suppliers selected to be paid, by clicking the PgUp/Pg Dn keys while the cursor is in the Supplier field.
1.1.1 Adding an invoice to a payment batch
Clear the form and then enter the Supplier name and Site.
Select Yes for Pay supplier.
AP displays the approved invoices for the supplier site.
Select Yes for Pay invoice for each invoice you want to add to the payment batch.
1.1.2 Removing an Invoice from Payment Batch
Query the Supplier name and Site.
AP displays the invoices for the supplier site which were selected for thepayment batch.
Select No for Pay invoice to remove it from the Payment Batch.
1.1.3 Removing all Invoices for a Particular supplier site from a payment batch
Query the Supplier name and Site.
Select a Non-Payment Reason for your records (Optional).
Select No for Pay supplier.
1.1.4 Changing payment or discount amounts for a selected invoice
Query the Supplier name and Site.
AP displays the invoice(s) for the supplier site, which were selected for the batch.
Alter the payment or discount amounts for the invoice.
No comments:
Post a Comment